Yes it is true! I built my kids a treehouse in our backyard. It was not hard to do and got us lots of outside time. I am by no means a master builder or have a bunch of amazing tools. I just had a vision and learned as I went. It did take me a full year to complete, with some side projects in between (see my
DIY page), but each step was fun and exciting to see take shape.
I will try to explain to you with pictures and words how I went about building our treehouse. I will not give specific measurements because the truth is that with treehouses you need to make the treehouse to fit the detentions of your trees and surrounding area. My hope is that this post can give you some food for thought and maybe the basis of a project that you could do for your kids in your backyard. When I started this project I didn't know what the final treehouse would look like. I did one step at a time and then figured out the next one as I went. That is the joy of DIY projects, watching how they grow and develop and then standing back and admiring the results of what you made yourself.

So the story of how I came up with the crazy idea of building a tree house start in our public library the winter of 2014. I have to admit that I get spring fever pretty bad and start day dreaming about what would be fun to do when the weather warms up. My son and I came across this book and our wheels started turning. The book was so fun to look at and made building a treehouse look simple. We starting talking about how cool it would be to have a treehouse in our backyard, every boys dream, and I could build it. Right?

After reviewing the book I decided that building a treehouse in a single tree looked a bit over my skill level. But then I came across this plan where you build the treehouse on a platform between two trees and a post. I liked this idea and started searching my grove for trees that would work for this purpose. The book dose and excellent job of describing what to look for in a tree and how far apart they should be. It gave me much direction in my early stages of treehouse construction. Check this book out it is filled with projects your kids will love, you may end up building more than just a treehouse.
Where I choose to build the treehouse was an overgrown grove at the time, so as soon as the snow melted the kids and I headed out to clear the area of unwanted sticks and logs. It was quite a job and led to a massive bonfire.
Now that we could get to the the area we began to dig a hole and set in the post that would make the third point in the triangle that the treehouse was to set on. We measured equal distance from each tree and spent a good amount of time digging a deep hole. The book give guidance on how deep to make the hole and how to fill it. We used a old telephone pole we had laying around the farm, they also make great fence posts. We filled the hole with concrete and made sure it was firmly set before going on to the next step which was putting up the cross beams that the treehouse would set on. My goal was to have the treehouse high enough to hang a tire swing under, so we set the bottom of the beams at 10ft. That is a long ways up.

The early stages of building this tree house called for more muscles than I posses so I had to ask for help form the best looking set of muscles I know, my husband. We used 2x6 boards attaching them to the trees and posts with lag bolts. The book describes what size board and lag bolt to use and how to properly install them. Lifting the boards up 10 feet and attaching them was not an easy task. We found it helped to nail a small board to the post at the height we wanted and rest the cross board on it. It was also important to make sure the boards were level all the way around.
Once the cross beams were up I started building the floor base of the treehouse. By this time I had built most of the playhouse I created for the kids. I built the playhouse as a way to practice building a house that wasn't 10 feet up in the air. I will refer you to that post on
DIY Playhouse to see how I make the floor base and many of the steps that follow. I used the same procedures to make both of these projects. The base for my treehouse is 10ft x 10ft. I built this on the ground where it is flat and then begged for lots of help to pull and push it up onto the platform. Whew, what a job.
Once the base was up we secured it to the cross beams with rope. This is also described in the book. Next I hauled up the decking board and secured them in place. I like using decking boards for flooring because the gaps allow any sand or dirt the kids might bring up to fall through, they are pretreated, and have nice rounded edges. After the flooring was in place I framed the walls of the treehouse. I decided to made my house 6ft deep by 10ft wide leaving a 4ft deck on the front. I also decided to orientate it so that the deck and ultimately the entrance to the treehouse was to the back.
Now came on of the portion of the project the kids were excited for, the tire swing under the treehouse. I went to the pile of tires we use to cover the bales over the winter (see
here) and got a nice big one, I think it is a semi tire, and it is very heavy. I plan on doing a post in the future on how I hung this swing. To attach it to the tree house I used an eye bolt that I put through both the decking board floor and the 2x4 that made up the framing of the front of the tree house above.
Now for the rafters of the treehouse. Once again I had to ask for help to figure out the angle for the top rafter joint. Here is a
site I found was helpful. I then hauled the rafters up to the house and marked where they would rest on the side walls. I then took them back down to the ground and cut out a notch so they would rest nicely on the walls. I cut out one and then used it a a template for the rest so they were all the same. I did leave a little overhang at the end of the rafters so the roofing would extend beyond the side walls of the treehouse.
For siding I used ceder board siding that I found at my local lumber store. I sided the walls about 3 feet up and then left the rest open. I wanted the treehouse to be simple and open to the outside. My husband also was excited to use the treehouse as a deer stand and the open sides were ideal for this use. Since he goes deer hunting only one weekend a year we'll have to see how many deer he gets from this new deer stand I made him.
So this is the way the treehouse stood for the winter. Occasionally the kids would climb up there but I knew that the next phase of the treehouse build had to be making a better, safer way to get into the treehouse.
Once again as soon as the snow melted I was out there checking things over and planning the next steps. I have to admit that I wasn't very good at taking pictures of each phase of building the stairs so you will have to imagine them.
I had decided on using a stairway/ladder combination. With young kids a stairway is he easiest way of getting up to the treehouse but a stairway that goes up 10ft is next to impossible to find and would take up a lot of space. So a combination of stair and ladder seemed to be the answer.
To start this project I first dug holes for 2 more telephone poles that I placed in a triangle with the original pole used for the main treehouse. I placed these poles so they were all 5 feet apart keeping the line between the two poles closest to the treehouse parallel to the treehouse floor base.
I then put up more 2x6 boards with lag bolts connecting the 3 poles in the same fashion as I did for the main tree house. I had bought my stairway prior so I knew what height they would reach to and I placed the 2x6 at the appropriate height to accommodate the stairs. I then attached the stair, making sure to use blocks as a firm landing at the bottom.
Once again I got some decking boards and used these on the stairs and also the triangle landing. I did have to attach some bracing boards inside the landing triangle so there was more support for the decking boards. Tip, I found it easiest to cut the decking boards to the longest length needed to cover that part of the triangle base and then later take a circular saw along the edge to cut the boards to the angle of the triangle.
I built the ladder out of simple 2x4 boards. I spent some time finding
an angle at which I wanted the ladder to lean for both ease of climbing
and stability. I cut the bottom of the ladder at this angle and the
attached the steps at this same angle. The I also cut at an angle at the
top of the ladder so it lay flat on the treehouse.
I was going to describe to you how I found these angles and was having difficulty doing this. I decided that a picture is truly worth a thousand words. Finding the angle was as simple as taking the side of my ladder out to the treehouse, setting it at the angle I wanted it, then using a scrap piece of wood drawing a line that would be parallel to the floor. I repeated this same procedure for the top angle. I did have to take into account the amount of length this would cut off of my boards. Simple enough.
I did secure the ladder so it would not move and be safe for the kids.
Now all that was left was to put up the railings and some rope for safety. Around the treehouse porch I used 2x4 boards but up the stairway and around the landing I used rope to cut down on cost. We will have to see how the rope holds up or if I will have to replace it with wood, chain, or cable in the future.
As you can see The tree house is simple with no front door or paint. So far the inside is mostly bare but I sure that will change over time.
Oh yeah, there was one final portion of the treehouse that I had to ask my husband to help me with and that was put the roofing on. As you can see in the background of the above picture our barn recently got a nice new roof after a wind storm ripped part of it off. We saved the usable pieces of tin from the old roof and my wonderful husband measured and cut the tin to fit the treehouse. He has the damaged hands to show his hard work with the tin snips. The tin worked great, it may not be water tight with the old nail holes in it, but then again all the walls are open so what does that matter. I like the cottage in the tree feel it gives the treehouse. Thanks again Paul for all your help and support of me and my crazy ideas.

Through the process of building and working on the treehouse I was constantly finding broken glass and pieces of metal all over the ground. I have decided that I unfortunately choose to build the treehouse on top of an old garbage dump location. I would collect bucket loads of glass and metal and with all the sticks and twigs on the ground I knew there were many more I couldn't see at the time. It was dangerous for the kids to walk barefoot out there and at my house during the summer shoes are often forgotten.
To solve this I decided to rake the play area thoroughly and then ordered a truck load of sand. I took a lot of work to move that much sand around by shovel and wheelbarrow, I have the blisters to prove it but I am in love with the results. The sand instantly transformed the treehouse area into a playground where the kids love to spend their time and I can feel ok about their lack of shoes.
From another part of the yard, where we had chopped down a big tree that fell down in a wind storm, I rolled over some tree stumps. My husband had nicely cut them into great sitting heights when he had taken down the tree and now years later they were nicely weather and without their bark. I placed them around the sand box area and along the path to the treehouse stairway to give little rest areas for adults watching kids or any little ones that may need a brake.
Since a truck load of sand was ordered I decided that the kids needed a proper sand box. I, with the help of the kids and husband, dug a big hole about 1.5ft deep with 6ft sides. I then built a wood frame with treated lumber, set it in the whole, and then filled with sand. If I could redo this I would made the sides higher to keep the sand in the box better. But since the surrounding area is also covered in sand it doesn't matter that much.
All the sand is a big hit with the kids and they are always digging and excavating trying to dig the biggest hole and find the bottom of the sandbox. With all the sand they track in the house sometimes I think we live on the beach.
Another necessity the kids reminded me of for the treehouse was a pulley, rope, and bucket. The pulley was given to Simon my oldest for his birthday, a nice one is not cheep, and the rest were left over parts from other projects. So far the pulley is just placed in a nearly tree. Later we many find a better place to put it.
The view from the treehouse towards the big house, just the right distance.
The tire swing in it's finished state. It is nice and cool under the treehouse, a perfect place for hot summer days. This is Mary's favorite place to be.
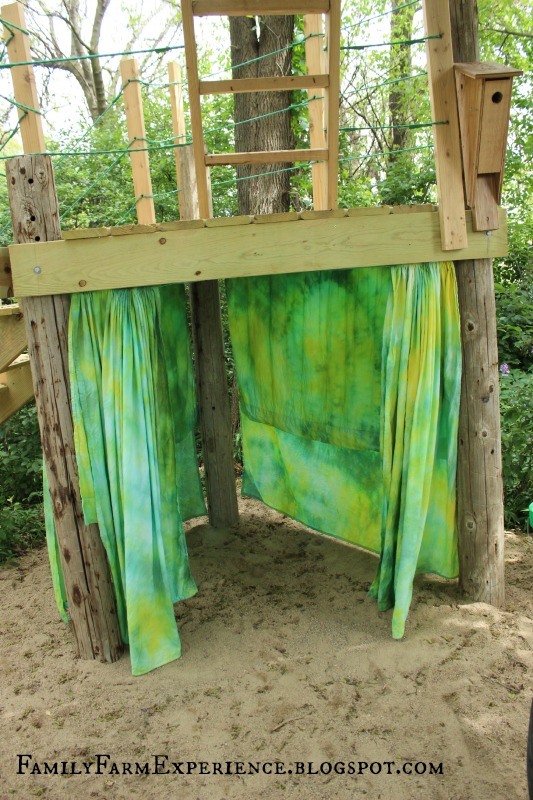
It was my daughter Mary's idea to put curtains around the triangle landing created for the stairway/ladder entrance. We gather some old bed sheets, tried our hands at simple Tye Dying and hung them up using wire and screws. It creates a fun hideout or stage and Mary calls it.
Even the little one's enjoy their time playing in the treehouse and the stairway makes getting up and down easy.
My crazy grew of diggers.
The part that I love the best about building a treehouse is all the life skills the kids have and will learn while helping me make it. Things like hard work, patience, dedication, teamwork, having a vision, and pride in seeing something you made come together. I also know that there will be so many wonderful memories and laughter created while playing together with siblings and friends here.
Childhood is so special and I love fostering that fun creative spirit. I encourage you to
create some play space for you and your kids. It doesn't have to be a
treehouse 10ft in the air, it could be a cardboard playhouse in the
backyard. Kids love this stuff and who doesn't love happy kids.


What a wonderful tree house! You did a beautiful job!
ReplyDeleteWhatever you do, when you build a treehouse, buy completely new materials at a home improvement center. Don't run down the basement and start decide to use that old discarded wood and nails that had been sitting for ages. For safety's sake, the material should always be brand new and in great condition. Saving a few dollars is not worth the risk.
ReplyDeletePleasance Faast @ Shelton Roof
This is so neat! The setting is perfect - I love all the trees and flowers around it and the sand is a brilliant idea!
ReplyDeleteGreat tree house idea.
ReplyDeletehttps://zinaukaip.lt/
Hello Viewers ,
ReplyDeleteI am Mrs Jane Harold from Florida, with a great testimony how i
receive my loan from this great and Legit company after been scammed,
I told my self that any lender that rescue my family from our poor
situation, i will refer any person that is looking for loan to them, i
was desperately in need of a loan the sum of $30,000.00 Dollars to pay
off my debt and startup a business, So happy i receive my loan few
days ago ,and if you are in need of a loan and you are sure you will
pay back the loan please contact and tell them that is Mrs Jane that
refer you to them. (+1-586-331-5557)
Contact Mr Jackson.
E-mail: (jacksonwaltonloancompany@gmail.com)
Fax: +1-586-331-5557
Address is 68 Fremont Ave Penrose CO, 81240.
Thanks for sharing this information ..
ReplyDeleteReconnect with nature at Tree house cottages in Jaipur — offering unique tree-top stays with modern luxuries.
This eco-resort is perfect for holidays, weddings, and corporate retreats.