Thursday, August 28, 2014

Tomato Soup for canning

    I am here today to share with you one of the oldest and best recipes my mother and I use for canning. I love this tomato soup and I'm sure that after you try it you will too. Now I have to warn you that this is an recipe for a big batch of soup. One batch will make you about 20 quarts of soup, but if you can like we do you will still have to double or triple the batch each time you make it.
 
   The first step of this soup is to head out to the garden, with your helper, and see how many tomatoes you have to work with for the day. My tomatoes are just starting to get into full production and I got just over 1 and a half 5 gallon pails. I do my canning with my mother and on this day she picked just under 1.5 pails so that gave us a grand total of 3 5 gallon pails of tomatoes. Looks like we will be doing a triple batch of tomato soup today. Lets get started.
     Here is the recipe. It is an oldie but goodie that originates from my grandmother who is 95 years old overhearing it on the telephone. The story goes that a group of neighbors would share the same phone line and you would know the call was for you by the number of rings when the call came in. My grandmother had heard that the neighbor was getting a good tomato soup recipe so she listened in on that neighbors call and wrote it down. The original recipe called for 2 pecks of tomatoes or a 1/2 bushel but we find a 5 gallon pail easier to measure with.


      After the tomatoes are picked take them in the house and clean them and cut out the tops and any bad spots. Place them in a big pot and cook them until they become juice. Cut up the vegetables and place them in a pot with some tomatoes on the bottom for moisture. Make sure to stir to keep it from burning on the bottom. I have learned that it is worth investing in a good thick pot because thin ones will burn easily and ruin the whole batch. Cook the vegetables until they too are soft and easy to juice.
 We put the tomatoes and vegetables though a blender prior to juicing then through the colander. This leaves very little waste and makes the process of making juice easier. Here you can see me and my sister Nancy doing this. It is fun to work with family and we enjoy visiting while we work making good food for our family. As you can also see we have a very big pan to mix everything in. It is important that at some point you are able to get all the tomato and vegetable juice into one container so that you can ensure one batch of soup won't have more vegetables in it than another. When doing a triple batch this can be tricky and it calls for big containers.
    We have a habit that when we can we fill things to the very top. The big pan was able to hold our triple batch of tomato and vegetable juice and no more. We gave it a good stir and then divided it into three big pots and placed it on the stove to start heating.
        The recipe says to add salt, baking soda, and a flour/butter mixture at this point. The soda when added makes the soup foam as it neutralizes the acid in the tomatoes. It is cool to watch like a science experiment. The flour and butter you make into a paste, like pictured above, and mix into the soup. Now you need to heat the soup to a boil and keep stirring to keep form buring on the bottom. Once boiling add the brown sugar and then when the soup is at a rolling boil it is time to place it in jars.
     This soup is canned boiling so there is no need for processing later. The jars will seal on their own when they cool. Some tricks to canning this way is to make sure the soup is in a rolling boil and have your jars sitting in hot water. If the jars are cold they might crack when the hot soup is put in them. We find that a cake pan with hot water serves the purpose. Fill the jars up to about a 1/4 inch from the top and place on a lid and ring and let cool. And there you have it delicious home made tomato soup.
     Luke, my youngest, couldn't wait to try the soup and every time he put some in his mouth he said "Yum-yum". I'm so glad we can make this good food for him and making it with produce from the garden is such a wonderful gift.

   Discloser: My family has been making this soup for years with no problems but I can not ensure that your process is the same as mine. If you have any concerns with this recipe please adjust it to suit your needs.


Tuesday, August 19, 2014

Salsa with corn and black beans

    Who doesn't love fresh made salsa using produce fresh from the garden? My mother and I do a lot of canning  this time of year and have tried many salsa recipes and I think we have came up with the best one yet this year. It is Salsa with Corn and Black Beans. Sooo good.
     I myself like a salsa that has some chunkiness to it that you can pick up with the chip. I feel that the corn and beans in this salsa give it that chunky texture that I like. The corn also adds a sweetness that I enjoy and the added beans and corn make this a very pretty salsa. 
   
 
        The directions are pretty straight forward you chop all the vegetables, except for the corn and beans, and mix them together. I use a food processor and it goes quick. As a note the easiest way to get the skin off the tomatoes is to blanch them in boiling water just until the skin start to split, them remove them from the boiling water and cool in cold water. When able to handle the tomatoes the skin should slide off easily. The place in food processor and chop until chunkiness you desire. Once all the veggies are in the pot put it on the stove to warm and then add the spices and other ingredients. The salsa does not have to boil but just warm. Then put in  jars and process for 15 minutes in a boiling water bath.
        As you can see canning day can make quite a mess in the kitchen. You can see in the picture the food processor I use and all the big pots required for prepping the salsa. There is a lot of activity and all the kids wanted to help. The boys helped me cut the corn off the cob, Mary helped me skin the blanched tomatoes and Rose helped grandma pick the seeds out of the peppers. Luke was just content to watch the action.


      When my mother and I can we are known to make numerous batches at a time. We gather the tomatoes and pepper from the garden and figure about how many batches it will be. This day we made a 5x batch. We also use the recipe as a loose guideline and add a few extra peppers or tomatoes in if that is whats ready in the garden. This day or salsa batch go so big we had to get out the really BIG POT so fit it all in.
        This salsa is also great fresh. I ate almost this whole bowl of salsa for lunch that day. To think many of the veggies in there were growing in the field or garden just that morning.

      The fruit of our labor. I enjoy canning and knowing that I grew and produced this food that my family will get to enjoy. I hope you try this salsa recipe for your family and I know you will be hooked. Enjoy.

What the Hay


        Making hay has been taking up a lot of time lately. Baling hay is a multi step process. First the grass is cut and has to lay and dry for a number of days until the grass is dry and breaks easily when bent. Wet grass will not keep and would start to rot before we need to use it over the winter. Once the hay is dry we use a big rake to pile the grass into rows and then the baler comes and rolls it into the nice tight bales. In our area we do a lot of ditch hay which we feed to the cows during the winter as part of their feed ration. Paul tells me that we have done about 500 bales this summer so far and there is still more grass to be cut.
       To keep the bales protected from moisture we stack them into piles and cover them with a tarp. It takes some strong tractors and gymnastics to get the bales all stacked right and the tarp on correctly. After the tarp is in place then it is held down with twine and tires. We need to make sure the wind doesn't blow the tarp off.  The kids were big helpers fetching tires. The men tied the twine to a small board and then threw it over the pile to the one waiting on the other side.  Then they would both tie their end to a tire.
Luke posing in the front of the loader among some of the tires that will be used.
David helping make a stack
Simon helping dad get the tires out of the back of the pickup.
 
The tarped and tired bale piles also made cute kid photo backdrops. Like tire swing all lined up in a row.
All 5 in the tires.


         As you can see we had some fun while we were working on the farm. The kids love being outside and part of the action. They like helping out and experiencing new things. Having the around helps keep the time fun and reminds us why were are doing all this work, so they could someday have the possibility to live and work on the family farm.


Saturday, August 9, 2014

Sweet!

      Sweet corn season is upon us and I have to say it is a point in the year I look forward to. I have been known to eat sweet corn until I have a stomach ache. Sweet corn is always the best eaten right off the cob only minutes after picking it. Sweet corn ripens and is done so quickly that a person feels like they must gorge on it while it is available.
      A few days ago we decided that the corn was just right for freezing. In our family we don't do anything small when it comes to freezing or canning produce for the coming year. This year we headed out to the field with the pickup full of buckets and came home with 15 5gallon pails full of husked corn. We had a big day of work ahead of us. The kids were of great help and I feel so blessed that they are able to have these experiences and memories while working together as a family.


        We all headed out into the sweet corn patch and got to work husking the corn. I remember watching my dad when I was a kid husk the corn with two pulls of the husk. He would divide the silk at he top and pull of each side of the husk and then snap it off at the bottom. I remember thinking he was amazing. I now have had some practice over the years and have perfected the quick husk and was teaching some of the kids how to do this.  Most of them still enjoyed the slow leaf by leaf husking and discovering the golden corn in the middle.
The kids posing with the full pails before we head home to cook and freeze it.
 
    The first step to freezing corn is cleaning the corn. We do this to remove any dirt and to clean off as much of the silk as possible. We then place the cobs of corn in big kettles of boiling water. The corn cooks for only a short time and then we remove it and quickly cool it in another sink. Then it is time to cut the corn off the cob and this is where the all hands are called on deck. The kids were given instructions on how to properly cut the corn and proved to be much help. It is fun all sitting around the table together talking and working.


        After it is all cut off the cob the corn is scooped into freezer bags and then taken to the freezer where it is cooled quickly. Once frozen the corn is good for years. I feel very blessed that we have this wonderful produce from the land to eat throughout the year and enjoy the family time and memories that come from preparing it for future consumption. It is a lot of work and a big sticky mess but well worth it.

Sunday, August 3, 2014

Visiting a Robotic Dairy Farm

 I had the chance a while back to visit an amazing robotic dairy. Yes robots milk the cows on this farm. It was a very educational visit and something I had never seen before. Technology is moving fast in agriculture, as it is in all aspects of life, and it was fun to witness what wonderful things can be accomplished.

This particular dairy that we visited has two robots which milk their 120 cows. Each robot can milk about 60 cows, and that is with each cow getting milked 2 or more times a day. The robot is stationary and the cows learn over time that they must come to the robot when they want to be milked. It was amazing to see the cows waiting patiently in line for their turn. No one was having to push them into the stall where the robot was. They went in willingly and calmly stood in place. I was told that one way they entice the cows into the milking stall is with some feed that they like. As the cow enters the stall the robot scans their ID and records how many pounds of milk that cow produced and how often they are coming to get milked. As you saw in the video above lazors are used to visualize the udder and place the milkers. Since the robot never needs to sleep the cows can come to get milked at their own schedule. Some may like a noon and midnight milking while others may like milking at 7am and 7pm. This flexibility leads to calmer cows which increases productivity.
Paul and my dad are walking down the large open barn where the cows and robots are.
 Robotic milkers were not the only robots on this farm. There was also a robot feed pusher. This robot ran off of GPS and would go up and down the bunk pushing the feed up so the cows always had fresh feed to eat. For quality production of milk it is important that the cows always have fresh appetizing food to eat.
There was also a robotic scratcher that the cows could walk under for a nice rub down. Who doesn't like a nice back rub every one in a while. Another example how happy, comfortable animals will perform and produce higher quality products for us.

 Between milking and eating time the cows rested in stalls filled with sand which is both comfortable and sanitary for them to lay in. The sand is sloped so that the head end is higher than the tail. You can see in this picture that the cows tail has been docked, which means the end was cut off when she was young. This is done to many agricultural animals including sheep, pigs and dairy animals. For this cow her tail was docked to help keep her udder clean. The long tail could have gotten manure on it and then transferred it to the utter. Without the hairy end of the tail the udder stays cleaner. Flies are controlled in the barn so the cow never misses the end of her tail.
David says hello to some cows
 We all had a fun time visiting this dairy. My oldest son Simon is very interested in robotics and when he heard that there was a dairy that used robots he was so excited to learn about it. A place that combined his two passions in life, robots and agriculture. For days after our visit he looked over the pamphlets and talked about all we had seen.
I snapped this photo as we were leaving. I thought that it was both picturesque and a visual example of how agriculture and technology can live together and flourish. Thanks for visiting. 

Friday, August 1, 2014

Memories in the making

     The time has come. All the preparations and hard work will be put on display for everyone to see. People will walk through the barns and think; look at how clean and calm those pigs are, those cows look so fluffy and even a young child can lead them, and those sheep are so white. It is time for the annual county fair.
      What many fair goers don't realize is the weeks and months of hard work that went into getting the animals and projects ready for this moment in time. Daily chores had to be completed. Hours of grooming and training had to be completed to calm the animals and make them perform and look their best for the competitions. Some may ask why do all this work for a few day fair and a ribbon. My answer is for the life skills learned and the memories.
        Working hard at a project teaches youth the feeling of pride and ownership in a job well done. In the show ring you can see the pride and joy in the 4-Hers faces as they show their animal to the judge. They learn how to work together with other and how to be respectful. Outside of the show ring their is fun times with fellow youth and friendship formed. It is all of this added together that keeps 4-Hers doing the hard work year after year, and what has parents encouraging their children to be part of this great organization.
 
      I have been busy taking pictures of some of the process for fair preparations. See this previous post here. Now it is down to entry day where we are taking the animals into the fair. Follow me as we go through the steps.
The day started off with clipping the pigs so their hair was shorter. We then washed them in the trailer before taking them into the fair. Sorry on picture of this, it was a bit wet.
      Once the pigs were clean the trailer was packed with all the feed, show supplies, and calves and off to the fair we went.
Once at the fair the kids helped chase the pigs into the pens were they will spend their time at the fair. Oh they look so clean.

Mary made sure that they had plenty of water and were happy in their new home for the next few days. They look happy.

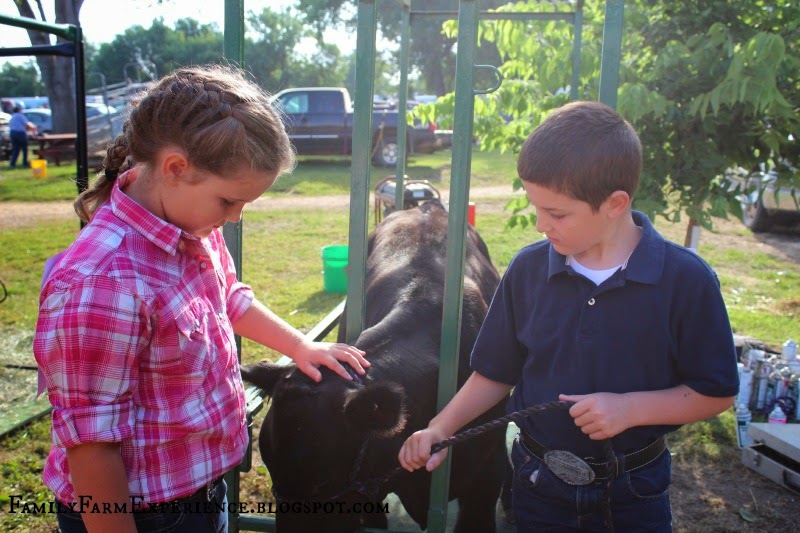
       The calves also were tied into their stalls and given food. Simon gave them a pat to help them know that everything will be OK. The calves were a bit nervous with all the new sounds and activities.
Rose is our little 4-Her in the making had to say hi to Fancy as she took a little nap

It was a big morning and everyone was hungry so a picnic lunch next to the beef barn was in order
       All the animals were put in their places and ready to start the fair. Now it is time for the shows to begin.
Mary "hopped" into the rabbit show to start out the fair. She showed another 4-Hers rabbit in the cloverbud show. When a youth is between K-3rd grade they can participate in shows and projects for experience and get a participation ribbon. Mary is wanting a rabbit badly so we decided that she would watch and learn this year what the project entails.
      Early the next morning it was time for the beef show. Many 4-Hers arrived to the fairground well before the sun came up to feed, wash, and groom the animals. Since our kids are young much of this was done by Dad with the kids help.
           Mary was the first one to show our calf Daisy as a cloverbud. Mary has enjoyed cattle from an early age and looks so confident holding the calf's halter. I can tell she has an amazing future in showing ahead of her.

One last picture before heading into the ring. Mary and her proud Dad.

Mary talking to the judge about her calf. She says he asked her things like; is this animal a heifer or steer, what breed is your animal, what do you feed your animal, what is your animals birthday, and what is the best quality of your animal.


        You might wonder what the stick is for. This is called a show stick and it is used to set the cows feet while showing them. You train the animal to move their feet when the stick is poked between their hooves. For beef they look best if their front and back legs are stretched our just a bit and their feet are even. After the feet are in the right place you use the little hook on the end of the stick to rub/itch their stomach. This calms the animal.
As a cloverbud an adult need to be also holding the halter in the show ring. Paul reported that he didn't have to do much because Mary was doing so well.

Not everything about showing an animal is glamorous and flashy. There is some dirty work that has to be taken care of.

Paul is working on getting the next calf ready and showing David how it is done.

Mary and Simon have a moment with Rodeo (whom we should rename because she is sweet now) before Simon goes into the show ring.

  • Some last minute advice from Dad

Simon is in the show ring and looking good. This is his first year showing a calf without help. He did an awesome job.


     It was a good beef show. Simon got one blue ribbon and one purple ribbon. But even better than the ribbons or placings was the sense of accomplishment that Simon felt after showing a calf all by himself. We are all so proud of him.
      Once the show is done there is still more work to be done. The calves needed to be washed again to get all the styling product out of their fur then combed and blow dried. After they are fed and made comfortable then we can take a rest, but not for to long because the hog show is in a few hours.

       Since our pig were so nicely cleaned prior to getting to the fair we only had to wash the dirty spots and feed them prior to the show. Then it was time to sit back and wait for the show to start.      
Due to busy day of shows the hog show had to be pushed back a few hours until the show ring was available. The kids played with water and sat and relaxed.

            Mary was the first one to show again in the cloverbud show. This time her grandma helped her out in the ring. Mary showed Fancy who was her favorite pig this year. Mary has had lots of practice walking Fancy around the yard and it showed in the ring. Mary looked confident and in control.

       Then it was Simon's turn to show. He did a fine job and practiced keeping his eye on the judge, keeping the pig between him and the judge, and keeping the pig moving. Pigs look best if they are walking and the goal is to keep your pig about 15ft in front of the judge walking back and forth. Simon has many years to perfect this skill but he sure has a good start in the art of pig showing.

      By the time the show was done Simon had been in the show ring 6 times and gotten some nice placing. Due to the late start the show didn't finish until 11:30 at night. Simon did look tired in the ring at times and it had been a long day but he kept going and gave it his best. Great job Simon. You are getting so big.
Here he is holding his ribbons looking a bit tired but proud.
           The shows are now done and the hard work payed off. The kids had fun showing their animals and looked confident in the show ring. Now we get to enjoy the rest of the fair and start looking forward to next year.