This spring I built a playhouse for the kids. I enjoyed making it and wrote up a post about how I did it here
DIY How to build your own playhouse. After the structure was complete I started on the inside. Every playhouse must have a kitchen and keeping with my DIY ways I built it myself and here is how I did it.
First I measured the area that I wanted my kitchen to fit within and started planning off of that. It is important that you measure the floor space between the 2x4's and not from wall to wall, because if the inside is unfinished like mine these measurements will differ. Next I went to my local ReUse store and found some cabinet doors that would work and fit into my plans. I knew that I wanted to make a refrigerator, stove, and counter top in the kitchen. I measured my children and the distance under my window and figured a 2 foot height for the counter top and stove would work well. The refrigerator I decided to make twice this height. An important thing to remember when getting your doors and planning the the dimensions for your refrigerator and stove is that you need to leave room for hinges and slight space between doors so that they can swing freely.
Some of the fine details are difficult to explain so I think the best way is to show you some pictures and give you some general guidance and let your own creativity take you from there.

I started with building the refrigerator and stove frame first. I knew that the counter top that I was going to put in could be made to any size so I decided it was best to build the refrigerator and stove, put them in the house and find out want space was left for the counter top. The frames for the refrigerator and stove I made out of 2x2 boards. I measured boards to my total upright height and then added cross boards at the heights that I wanted dividing shelves. Remember when cutting these cross boards that you need to subtract 1.5 inches for each of the 2x2 on either side to your total distance is what you want. In my refrigerator I used a 2x4 on the side I wanted to hinge my door thinking that I needed the extra space for the hinges. After finishing the refrigerator I discovered that a 2x2 would have worked fine. Some of this project was trial and error.
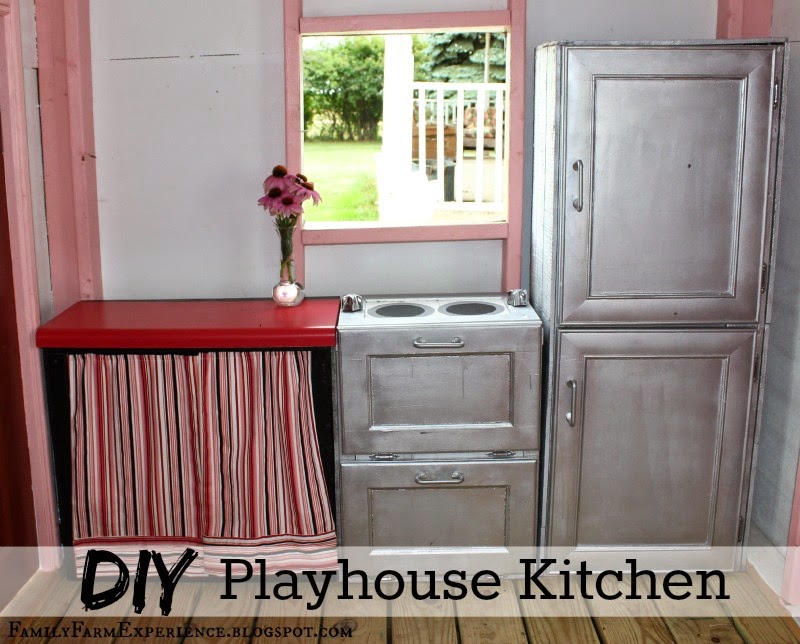
After all the 2x2 are put together I used some scrap plywood to make the shelves. I measured and cut out the squares of plywood and then notched out the corners to fit around the 2x2. Then I faced the outside of my frig with leftover siding from the playhouse. You could also use plywood, I liked the siding because it was it is thinner then the plywood. For the fridge covered the top and both sides and put plywood on the back.


The stove I constructed in a similar way using 2x2 boards. I used a 2x4 for the division between the top and bottom shelf for the hinging of the doors. In this case I think the 2x4 is useful. For the stove I added the shelves and put siding on the one side away from the fridge in my kitchen setup and the back. I didn't feel it was necessary to use siding on the side facing the fridge, since the frig would fit snugly against it, but you sure could if you wanted. As you might be able to tell by looking at the material I use I try my hardest to use left over material form other projects to keep costs down and after a coat of pain no one knows the difference. So on that note lets get painting.

I though it would be fun if my fridge and stove were magnetic like a the real thing so I used a magnetic paint product I found at my local home store. It required a few coats but went on easily. I'm not sure if I am in love with the results. The magnets do hold if placed carefully but fall if if the door is bumped or closed hard. After this magnetic paint dried I used a silver metallic spray paint to give the fridge and stove a stainless steel look. I might not have stainless in my house but why can't the kids have it in the playhouse! I spray painted the door before hanging them to make sure I got good coverage on them and the frame of the fridge and stove.
After hanging the door and adding some hardware here is the finished product. I am happy with how it turned out. Not professional but suitable for a play house.
The stove got two doors on the front and another one on the top. The door on the top I painted to look like a stove top. I used some bowls to trace the circles and then got out my acrylic paint and painted on the burners. I used some faucet knobs I found at the hardware store for the temperature controls. Adding something that turns always adds to the fun for kids.
The last piece I needed to make was the counter top. I waited to build this until I had the fridge and stove complete and moved into the playhouse. I then measured the remaining space and built a simple base for my counter top. Again I used 2x2 boards and built a box that would be the base for my counter top. I made sure to subtract the heights of my counterop from the overall height of the project to make sure that the total height of the counter top was the same as the stove top.

As you can see I added a back and side on that is facing away from the stove and then painted it all black. No you might be wondering where I got my counter top. I have to tell you I'm not sure how I found it and the price was heaven sent. At my local Menard's I happened to be looking in the area where they have finished boards that you would use for shelving and there was a whole pile of laminate counter tops in many colors that were only 11 inches deep. Perfect for my project. They were 4 feet in length and only cost $1.99. I kid you not. I found this awesome red one which goes with the color's of red, white, black, and pinks I'm using in the playhouse. I took the counter top and cut it down to size and it works perfectly. I have to say this is the best find I have ever come across. If you can't find an actual counter top like this, I think a painted piece of smooth plywood would also work.

For a finishing touch I hung some homemade curtains over the front of the cabinet instead of door because it is much easier and adds some texture and color. I wanted to keep the cabinet simple because with kids sometimes simple is best.
So there you have it: a playhouse kitchen. I have fun building these projects and I hope I can help inspire you in your next adventure. Now let's play!


I even have been getting a lot of helpful and informative material in your web site.toaster retro
ReplyDeleteHello Viewers ,
ReplyDeleteI am Mrs Jane Harold from Florida, with a great testimony how i
receive my loan from this great and Legit company after been scammed,
I told my self that any lender that rescue my family from our poor
situation, i will refer any person that is looking for loan to them, i
was desperately in need of a loan the sum of $30,000.00 Dollars to pay
off my debt and startup a business, So happy i receive my loan few
days ago ,and if you are in need of a loan and you are sure you will
pay back the loan please contact and tell them that is Mrs Jane that
refer you to them. (+1-586-331-5557)
Contact Mr Jackson.
E-mail: (jacksonwaltonloancompany@gmail.com)
Fax: +1-586-331-5557
Address is 68 Fremont Ave Penrose CO, 81240.