Monday, September 29, 2014

Soybean Harvest 2014


       All of a sudden harvest 2014 is upon us. Summer seems to have flown by this year and the soybeans have gone from green and lush to harvest worthy in a blink of an eye. The change in season is one of my favorite things of living on the farm. Each season has it's own beauty and excitement that comes with it. Harvest is most definitely one of the most exciting and busy times of the year. Every crop farmer anxiously waits until they can start up the harvester and head out into the field and get that years crop safely into storage. This years soybean crop appears to be average which we are happy for due to the lack of rain we had during the summer months.
        As I said harvest is a busy time and requires lots of man hours and some specialized equipment to get the job done. I would like to spend some time introducing you to the main machines that we use during harvest.
         The first piece of machinery, and possibly the most important in harvesting, is the combine. A combine collects the grain out of the field. The front part of the combine has an attachment called a head. Combines have different heads for the different types of grain that can be harvested. Currently this combine has on a small grain head which we use for soybean harvesting. As an interesting fact this small grain head is so large, 35 feet across, that it can not fit down the road attached to the combine. Each time we move from one field to another we have to detach the head and put it on a wagon and pull it to the next field. Some small grain heads come as large as 45 feet across.  The small grain header consists of a long line of sickles, or knives, that ride low to the ground and cut the plants down. Once the plant is cut down it is brought into the combine by a big rotating reel. Inside the combine the grain is separated from the plant and the grain travels up to the holding tank on the top of the combine and the plant is blown out the back of the machine.
         Now it is true that collecting the grain is the most important job of the combine but today's combine does so much more than just harvesting grain. Inside the combine cab there is a whole computer system with a number of monitors which  collect all kinds of information about the field and crop.  The combine can give the farmer real time data on grain yield and moisture of the grain. The combine is also driven by GPS. You can see the yellow globe on the top of the combine cab, this is the GPS receiver. All this information is integrated and stored in the computer for future use. The computer that is  in the combine is the same one that was used in the planter in the spring and the tractor that did the spraying during the summer. This allows us to compile information from planting to harvest to make decisions for next years crops. We can look at things like how many seeds were planted in a portion of the field, how much fertilizer was applied, and how the crop yield was. With this information we can make decisions that will allow us to make the most of every acre we farm. Our goal is to be the best stewards of the land we can be and help it be top production.
            From the combine the grain then gets put into a huge grain cart. The grain cart is used to transport the grain from the combine to the trucks that will take the grain to the storage bins or the elevator. We often unload the combine into the grain grain cart while the combine is still harvesting. This saves on time because the combine doesn't have to stop. It takes good communication between the two drivers and lots of practice. It is made easier by the fact that the combine is driven with GPS so it will go nice and straight at a constant speed. There are still many things the grain cart driver has to watch to make sure everything goes smoothly.
            Once the grain cart is full it is driven to where the semi is waiting. Or grain cart is large enough to hold a full semi load of grain. The grain cart has a scale system that tells the driver how much grain is in the wagon and when it is full enough.
          The grain cart driver unloads the wagon into the semi. This is also a job that takes some skill. With the large auger on this wagon it doesn't take long to fill up the semi and then off the semi goes to unload into the grain bin or elevator. Since we live close to town and most of our fields are close to our farm site we are able to transfer the harvest with one semi and grain cart. This does mean that they are always moving and there isn't much down time
         On our farm this is a system that works well for us. Every farmer has a slightly different way of harvesting depending on how much help they have and what resources are available to them. I would say that these three pieces of equipment of something similar are very common to see in the fields at harvest time. So the next time you are driving in the country during harvest and see some machines in the fields you can know what they are and what there job is.
       Luke is my constant companion these days and he loves watching the big machines as they work. So cute.

Monday, September 22, 2014

Vaccinating calves

        Yesterday we got to spend a busy morning vaccinating our new weanling calves.  We weaned our 130 calves a few weeks ago and they have adjusted well to life in the feed lot away from their mothers.  Want to see and hear the calves as we were weaning go here Weaning Calves. Now that the calves are fully weaned it is time to vaccinate them against any illnesses they would possibly get while living out the rest of their life. Just like children need vaccinations to keep healthy and prevent them from caring diseases that might make others sick, we need to vaccinate the calves so they stay healthy. Some of the vaccines are given through shots and others are given by nasal spray.
       The pictures I have are from years past. Since my hands were busy helping yesterday I didn't have time to take photos and I knew I had these I could use.

         In this photo I am administering some nasal spray medication to a calf. It is a lot like getting flu mist and doesn't hurt them at all. Any shots that the animal needs we give in the neck. We choose to use this area because it is not where high quality cuts of meat come from and it is easily accessed for giving the injection. As you can see we use a head gate system to hold the animals in place while we are giving them medication. We use the head gate by closing the gate on the animals neck while they are trying to walk through. This does not choke the animal but hold them place until we open the gate back up. The one running the head gate has to be quick to close the gate at just the right time. Vaccinating calves is not an easy job and takes quick hands, strength, and patience.
          Here you can see that vaccinating cattle is a all hands on deck job. We have a double ally system leading up to the head gate which works with cattle psychology. The animals move better when they see another animal next to them. You can see my sister standing up looking over the alley making sure the cattle keep moving forward. My brother in the green is working the tailgate which he closes when a calf come through and prevent more than one animal getting into the area where we are giving the medication. Along with working the tailgate he is giving a topical medication. My husband Paul, in the yellow shirt, is the one who runs the head gate and gives many of the injections. Sometimes the calves get 3-4 injections at a time. My brother-in-law Bill is in the brown shirt and is recording information. He needs to write down the ear tag number, which is like their name or identification, of each animal and the weight. He also records any other important information regarding the animals. Another important person in this process is my father who is in the back working with the cattle. He is the one who makes sure there are always animals ready to come into the alley so the ones giving medicaiton don't have to wait for more animals. These are the basic jobs that need to be performed when we vaccinate the cattle. It does take a lot of teamwork and understanding what your job is in the process.
        Here I am holding my youngest when he was 2 weeks old and doing the recoding while sitting in the pickup cab.
      The kids enjoy watching and being part of the activity when we need to vaccinate the cattle. They learn to do simple jobs like putting ear tags onto the taggers. From a young age they see how a we care for the animals and how to act around cattle. They are learning that cattle are big strong animals and need to be worked with carefully. They are also learning that we need to give the animals medications at different times to keep them healthy and treat illnesses.
     Vaccination days can be stressful but they are also times were we get to work together as a family and see the fruits of our labors in the animals we are working with.
        Looking through my photos I came across this one from a few years back that I love. The summer seems to be over all to quickly and fall is upon us. The crops will soon be harvested and the cows brought in from the pasture. I can't believe another summer is gone. It has been a good one.

Wednesday, September 17, 2014

DIY Large bench made with cabinet doors

       Here is a DIY bench I made a few years back. I made this bench prior to my blogging days so there are no pictures of the process, sorry, so here a tutorial on how I did it.
      First off this project started when I wanted for a bench in my entryway. It needed to be large and I didn't want to pay the price for a nice bench from a furniture store. I originally thought of making a bench using a bed headboard as the back but had trouble finding one that suited my likes. So after some thinking and looking around I came up with the idea of using some cabinet doors as the backrest. I love how it turned out, and I have to admit it was only the start of my addiction to using cabinet doors in my projects, as you will see in my other DIY builds.
     First step was to build the frame of the bench. Under the seat is a simple rectangle box with cross sections made our of 2x4 boards. I then attached the legs to the project which are 4x4 boards cut to length. I attached the front legs to the inside corners of the 2x4 frame making sure to secure them well. The back legs I made longer so they reached almost up to the top of the backrest of my bench and secured them to the outside back of my frame. I did place these back legs in a way from the edge because I didn't want them at the edge of my backboard. Next I placed some plywood on the top of the frame where the seat would be. I then got some inexpensive unfinished hardwood flooring boards from my local home improvement store and placed these on the plywood as if I was laying a hardwood floor. I made sure to nail down each section of board with an air nailer to keep them tight and secure. Once the seat was complete I finished off the front and sides with a large piece of oak that I had left over from some home projects. I cut the corners at a 45degree angle so they came together nicely.
    Now it was time for the cabinet doors. I get my doors from a ReUse store in my town. They get doors donated from a local cabinet maker that are not acceptable for their use. I find them perfect for my projects and there are so many sizes, wood types, and styles to choose from. For this project I purposely choose doors that had different woods and styles. I went with two heights and varied the withs. I played around with different size doors and arrangements until I came up with one that I liked. I did get the doors, arranged, and measured them before I started this project so I could base the seat size accordingly. To mount the doors I layed them out facing down and took a thinner piece of plywood that was cut to cover the entire length of the back but be slightly smaller so that it wouldn't show from the front. I used screws to secure each door to the plywood fastening the screw from the plywood side into the door backs so they wouldn't be seen. Finally I attached the doors to the back legs of the bench using screws that I sunk into the 4x4 about half way.
      The final step was a couple coats of clear polyurethane. I love all the different natural wood colors in this project and how all the wood grains show up. I have to say that applying the first coat of poly is my favorite step because it make all the wood come alive.
      I didn't add any dimensions to this tutorial because this bench could be made to whatever size best fits your need. For the depth of the bench and seating height I would suggest to look at other seats in your house and find one that you like and take measurements from that. Another suggestion is to keep it simple, sometimes it's OK if a project looks a little DIY and original, don't get disappointed if everything doesn't come together perfectly. Have pride that you made it and I'm sure others will be amazed at what you did.
     Thank you for your interest in my bench. Please click on the DIY page (under the blog title) and see my other projects, I hope you like cabinet doors because I sure do.

Sunday, September 14, 2014

DIY Playhouse Kitchen


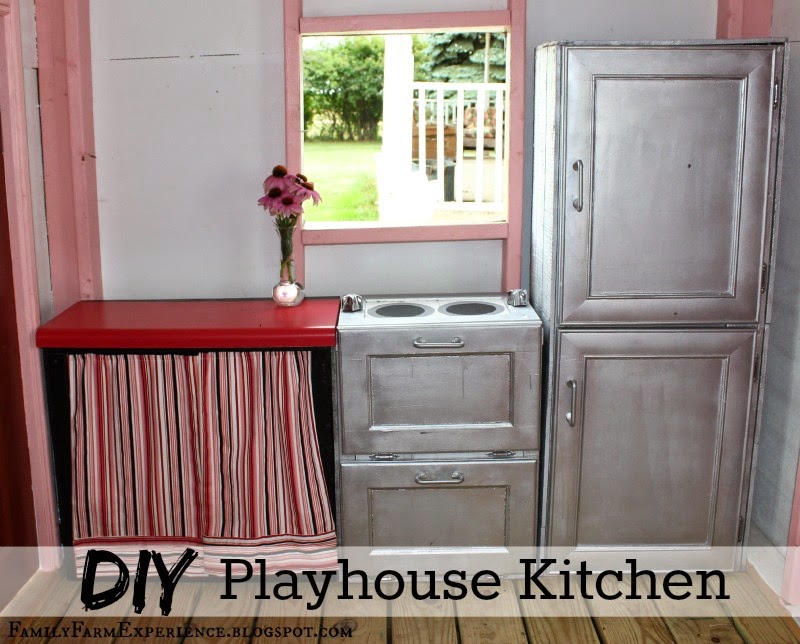
     This spring I built a playhouse for the kids. I enjoyed making it and wrote up a post about how I did it here DIY How to build your own playhouse.  After the structure was complete I started on the inside. Every playhouse must have a kitchen and keeping with my DIY ways I built it myself and here is how I did it.
     First I measured the area that I wanted my kitchen to fit within and started planning off of that. It is important that you measure the floor space between the 2x4's and not from wall to wall, because if the inside is unfinished like mine these measurements will differ. Next I went to my local ReUse store and found some cabinet doors that would work and fit into my plans. I knew that I wanted to make a refrigerator, stove, and counter top in the kitchen. I measured my children and the distance under my window and figured a 2 foot height for the counter top and stove would work well. The refrigerator I decided to make twice this height. An important thing to remember when getting your doors and planning the the dimensions for your refrigerator and stove is that you need to leave room for hinges and slight space between doors so that they can swing freely.
    Some of the fine details are difficult to explain so I think the best way is to show you some pictures and give you some general guidance and let your own creativity take you from there.
     I started with building the refrigerator and stove frame first. I knew that the counter top that I was going to put in could be made to any size so I decided it was best to build the refrigerator and stove, put them in the house and find out want space was left for the counter top. The frames for the refrigerator and stove I made out of 2x2 boards. I measured boards to my total upright height and then added cross boards at the heights that I wanted dividing shelves. Remember when cutting these cross boards that you need to subtract 1.5 inches for each of the 2x2 on either side to your total distance is what you want. In my refrigerator I used a 2x4 on the side I wanted to hinge my door thinking that I needed the extra space for the hinges. After finishing the refrigerator I discovered that a 2x2 would have worked fine. Some of this project was trial and error.
      After all the 2x2 are put together I used some scrap plywood to make the shelves. I measured and cut out the squares of plywood and then notched out the corners to fit around the 2x2. Then I faced the outside of my frig with leftover siding from the playhouse. You could also use plywood, I liked the siding because it was it is thinner then the plywood. For the fridge covered the top and both sides and put plywood on the back.

          The stove I constructed in a similar way using 2x2 boards.  I used a 2x4 for the division between the top and bottom shelf for the hinging of the doors.  In this case I think the 2x4 is useful. For the stove I added the shelves and put siding on the one side away from the fridge in my kitchen setup and the back. I didn't feel it was necessary to use siding on the side facing the fridge, since the frig would fit snugly against it, but you sure could if you wanted. As you might be able to tell by looking at the material I use I try my hardest to use left over material form other projects to keep costs down and after a coat of pain no one knows the difference. So on that note lets get painting.
        I though it would be fun if my fridge and stove were magnetic like a the real thing so I used a magnetic paint product I found at my local home store. It required a few coats but went on easily. I'm not sure if I am in love with the results. The magnets do hold if placed carefully but fall if if the door is bumped or closed hard. After this magnetic paint dried I used a silver metallic spray paint to give the fridge and stove a stainless steel look. I might not have stainless in my house but why can't the kids have it in the playhouse! I spray painted the door before hanging them to make sure I got good coverage on them and the frame of the fridge and stove.
     After hanging the door and adding some hardware here is the finished product. I am happy with how it turned out. Not professional but suitable for a play house.

   The stove got two doors on the front and another one on the top. The door on the top I painted to look like a stove top. I used some bowls to trace the circles and then got out my acrylic paint and painted on the burners. I used some faucet knobs I found at the hardware store for the temperature controls.  Adding something that turns always adds to the fun for kids.


     The last piece I needed to make was the counter top. I waited to build this until I had the fridge and stove complete and moved into the playhouse. I then measured the remaining space and built a simple base for my counter top. Again I used 2x2 boards and built a box that would be the base for my counter top. I made sure to subtract the heights of my counterop from the overall height of the project to make sure that the total height of the counter top was the same as the stove top.

       As you can see I added a back and side on  that is facing away from the stove and then painted it all black. No you might be wondering where I got my counter top. I have to tell you I'm not sure how I found it and the price was heaven sent. At my local Menard's I happened to be looking in the area where they have finished boards that you would use for shelving and there was a whole pile of laminate counter tops in many colors that were only 11 inches deep. Perfect for my project. They were 4 feet in length and only cost $1.99. I kid you not. I found this awesome red one which goes with the color's of red, white, black, and pinks I'm using in the playhouse. I took the counter top and cut it down to size and it works perfectly. I have to say this is the best find I have ever come across. If you can't find an actual counter top like this, I think a painted piece of smooth plywood would also work.
       For a finishing touch I hung some homemade curtains over the front of the cabinet instead of door because it is much easier and adds some texture and color. I wanted to keep the cabinet simple because with kids sometimes simple is best.
        So there you have it: a playhouse kitchen. I have fun building these projects and I hope I can help inspire you in your next adventure. Now let's play!

Sunday, September 7, 2014

Weaning calves

   Yesterday was a big day on the farm as we weaned all 130 calves that are under our care. All summer the calves and cows have been enjoying life in the pastures eating grass and living lazy days in the shade. With harvest just around the corner and the calves getting bigger every day we decided it was time to wean he calves.
    The calves have been growing well and are at the point where they need some extra supplement feed to grow into productive beef animals.  The mother cows and calves are not happy to be separated from each other but they will soon adjust and this is a necessary part of the beef production process. All the mother cows are now pregnant with their calf for next spring so it is healthy for them to wean this years calf so their body can focus energy on growing the unborn calf for next year.
 
       The first step in the process of removing the calves from the pasture is bringing all the animals up into a working area we have created in our different pastures. Each pasture has a little different set up depending on it's lay out. We did find that some working areas worked better than others.  This is the pasture behind our house so this working areas is on the back side of our barn.
       Here all the animals are gated into an area where we can work with them. As you can see we don't have sticks or whips. We find that if we act calmly around the animals and learn how to work with some of their natural instincts sorting and moving them goes much easier.
      Here you see the cows walking away from the working pen. The men inside the working area are patently filtering out the cows from the group and keeping the calves behind. It takes a lot of time and practice working with cattle to have this process go smoothly. There is a lot of noise with mooing and cattle are big animals that can move fast. You have to stay aware at all times and move and think fast.
        All the calves have been separated from the cows and are loaded into the trailer.  It is a little sad watching the cows as the trailer pull away and know that they won't see their calves again. The cows moo after their babies and will stand by the gate calling to them for days. After a while they will come to the gate less often and start to enjoys their days in the pasture like they did before.
         The calves are taken to our feedlot building and made comfortable. They are all a bit anxious and on edge calling to their mothers. They also will continue to bawl for about a week and then gradually they will start to settle into their new way of life and quite down.
        They are given some feed and look so small reaching into the feed bunks. It is hard to think that by next May they will be big full grown market animals filling up the whole barn.
       A group of cows that are in the yard look through the fence at the crying calves in the barn. At this time it is important to have strong gates and pasture fences that are working at well.
       Here is a video of the calves in the barn just after weaning. Watch it as hear how loud they are. Now just imagine it going on day and night for about a week.

Tuesday, September 2, 2014

Spaghetti Sauce


    I think you can tell from my last few posts that canning has been consuming lots of my time as of lately. My mother and I can together and this time of year we have tomatoes ready to for canning about every 5 days. Between our two gardens we typically get about 3-4 5 gallon pails of tomatoes so these canning days are never small or easy. One of my familie's favorite product from our canning is spaghetti sauce. We can eat spaghetti once a week in our house and the kids love it every time.
      Without further ado here is the recipe.

    I didn't take any pictures of the canning process because my hands were busy but here is the commentary. First clean your tomatoes and cut the stems and any bad spots out. Put the tomatoes in a big pot and place on stove. Cook the tomatoes, stirring frequently to keep the bottom from burning until they are very soft and juicy. Remove pot from stove and ladle tomatoes into colander. Juice will separate from the skin and seed into the pan below.  You now have tomato juice.
    Now take the onions and garlic and grind them up in a blender using some tomato juice. You can make them as fine or course as you would like for your spaghetti sauce. Next put all the tomato juice and ground onion/garlic into a big pot and give a good stir.
    Time to add the remaining seasonings.  The corn starch can be a little tricky because it likes to clump and get thick.  We like to mix the corn starch into a paste using some of the tomato juice  in a separate bowl and then add it to the big pot. After all is added, simmer and stir. Once thickened you can pour into jars filling the jars to bottom of the neck, about a 1/2 inch from the top. Once filled place a new lid and a ring on each jar. Process the jars in a boiling water bath for 20 minutes.
    The hard work is now done and you have wonderful Spaghetti Sauce to enjoy. Sooo Good.
On this day we did a 7x batch. No biggie only 63 quarts this day.